Simple signal drawing on graphical LCD

0 comments
During spare time I have been playing with graphical LCD. This time I decided to display simple signals that are stored in microcontroller memory. The idea was to read signal values from look-up table and display waveform on Graphical LCD. To make things more interesting I divided LCD screen in to smaller four screens so I could activate them separately and draw signals in them.


Graphical LCD is the same old HQM1286404 with KS0108 controller. I have used Proteus simulator 128×64 graphical LCD(LGM12641BS1R) which is based on KS0108. How to implement and connect LCD there was a blog post (Simulate KS0108 graphical LCD with Proteus simulator)about it. I am just going to show main program routine.


As I mentioned I have split 128×64 in to four smaller screens like this:
Read more ►

USB INTERFACE BOARD USING PIC18F4550 Microcontroller

0 comments
TUTORIAL FOR BEGINNERS
It’s a low cost USB interface Board that provides cool interface to your computer and it can be used to control various devices like DC Motor, Stepper motor ,Servo ,relay switch etc with your laptop or any computer with a USB port and dot net framework installed. A small C# program communicates with the hardware to issue commands to set the pins of the Microcontroller. Inspite of LEDS u can use it as control singnals for your project.

USB controlling is more cool than that of parallel port. Rather laptops now days don't come with parallel port, so a USB port is a bit easy replacement.The Video will show u my usb Interface Board, see its working , i will post links for making your own Micro-controller board .

As Audrino Boards are very costly and if are beginner with microcontroller then you really don’t wanna invest so much on a audrino board for the 1st time on microcontroller, rather if you make one mistake then you microcontroller is fumed (like exceeding Vmax of microcontroller).


The Video below will show u my USB DEMO INTERFACE DEVELOPMENT BOARD, see its working in the end i will post links for making your own Micro-controller board .

I WILL PUT TUTORIAL TO MAKE THIS BOARD AT THE END PART.
Read more ►

SD/SDHC Card Interfacing with ATmega8 /32

0 comments
Here is my project on interfacing of SD Card (microSD). microSD cards are available very cheap nowadays, a great option for having a huge memory in any embedded system project. It is compatible with SPI bus, so the interfacing is easy. SD card adapters are also easily available in market, one can easily make a bread-board adapter by soldering few pins on it. Following figures show the SD card pin-out & the bread-board adapter design by soldering 7-pins of a breakout header on the microSD adapter (Click on images for larger view).

I had started this project with 1GB microSD card from SanDisk (later on tested with transcend cards also). The microcontroller is AVR ATmega8 or ATmega32 running at 8Mhz internal clock. MAX232 is used to interface the circuit with PC for monitoring the data. A 3.3v supply is used for powering the mega8, microSD and max232 (though the specified supply for max232 is 5v, it works comfortably at 3.3v).7 pins of the microSD are used here, shown in the figure of pin-out.


Schematic for ATmega8 is shown here (updated on 10 May 2010, SD series resistors are removed, as they were limiting the speed of SPI bus. 51k pullups are added on CMD/DAT lines. This gives better stability with different cards. Also, two 3.6v zeners are added to protect SD in case when the ISP programmer voltage levels are of 5v. these diodes are not required if your programmer has settings for 3.3v output)
(Note: VCC & GND pins of MAX232 are not shown in the schematic, but they must be connected in the actual hardware)

Following is the schematic for ATmega32, without RTC (updated on 10 May 2010):


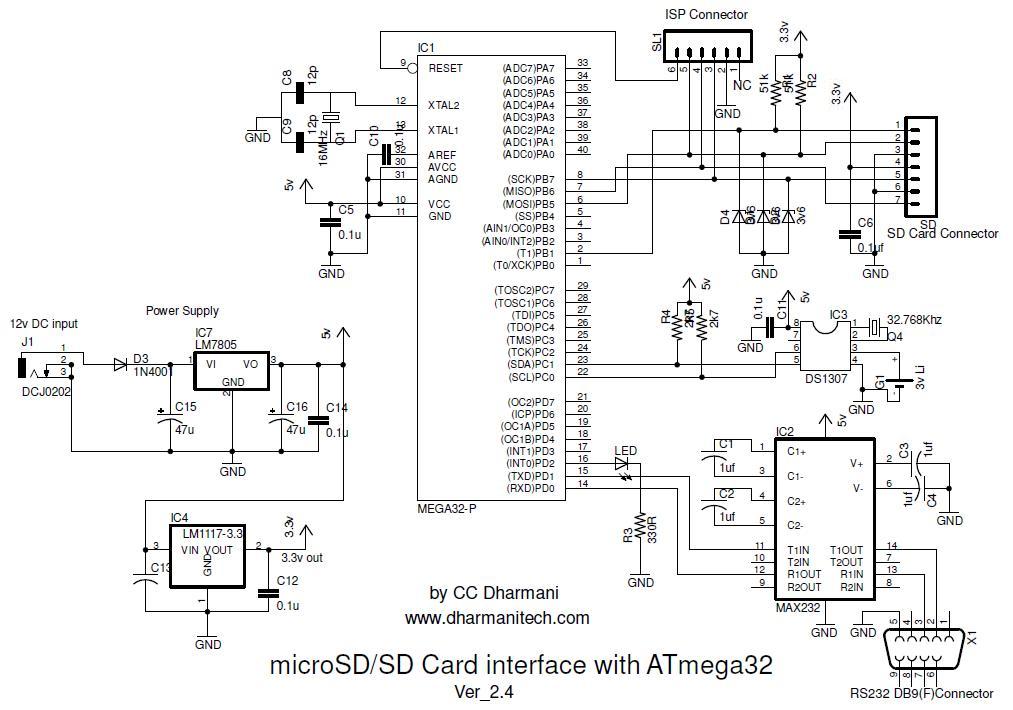
Following is the schematic for ATmega32, with RTC (added on
17 May 2010). Here two supply voltages are used, 3.3v for SD & 5v for remaining ICs.


The aim of this project was to learn interfacing of SD card and to understand the data transfer in raw format as well as in FAT32 format. I started with raw data transfer, sending some data to any block of the microSD, reading a block of it, reading and writing multiple blocks, erasing multiple blocks. All this in raw format. I used RS232 for viewing the data read by microcontroller from SD card. The uc sends the data to HyperTerminal. Similarly, to write data to card, the data was fed thru HyperTerminal, by typing some text.
Read more ►
 

Copyright © nhbinh1985 Design by O Pregador | Blogger Theme by Blogger Template de luxo | Powered by Blogger